Between Linux and Anime

Kind of like Schrodinger's Cat

Category: Howto’s (Page 2 of 4)

Resizing/Shrinking a Windows NTFS Partition past the “Immovable System Files”

This cost me a whole evening, especially nowadays when some manufacturers don’t actually ship a Windows CD with their hardware anymore – so you can’t even just thrash Windows and reinstall on a smaller partition. Just so much effort to beat Windows into letting me install Linux alongside it in a manner that I want. It’s deliberate I tell you. Geez.

So the Windows default disk management tool that is the standard (and, presumably, safest) way to shrink a Windows NTFS volume is basically shit, unless you’re satisfied with only freeing a very modest amount of your volume’s free space. I always knew that. What continues to surprise me is how difficult it can seem to work around this inadequacy (a glaring one, I might add, that has been around since Vista). People have created utilities to find the “immovable” system files that are blocking the shrinking and proceeded to remove them one by one by guesswork. Free Software partitioning swiss-army-knife extraordinaire GParted can also be used to shrink the partition, but this borks the installed Windows system in the process, requiring a Windows CD to fix in a separate, tedious procedure.

As it turns out though, there is a program, freeware for personal use (not, unfortunately, free software), that.. just does the job for you. The program is MiniTool Partition Wizard, and it’s inexplicably pretty hidden on Google when I was searching, not even being mentioned in this otherwise informative and comprehensive article on the subject.

This thing works, I tried – I managed to shrink my volume by 200GB or so more than the default Windows tool would let me. There is another surprise though: you’d think you’ll need the “bootable CD” version to get this done since you can’t have windows mounted and running while the process takes place. Don’t waste your time – I spent a good chunk of time trying to hack the thing onto a flash drive (not having nor willing to sacrifice a blank CD), only to find out that the bootable image runs off some super-ancient version of Fedora Core (Surprise surprise, Linux!) that just wouldn’t boot on my modern hardware.

Just get the Home Edition: it will actually prompt you to reboot your box, and will proceed to complete the shrinking before letting Windows start. I wished this was clearer on the website.

Oh, of course, the standard precaution applies: back up anything important before doing this. Apparently complaints do exist that the tool wrecked their drive. Still, a solution that works most of the time is better than no solution.

1197
Rate this post
Thanks!
An error occurred!

Cannot play anything with VLC on OpenSUSE?

Mplayer and Kaffeine and such work perfectly fine (which means codecs are properly installed)? Getting irritating and inexplicable errors like these?

main decoder error: no suitable decoder module for fourcc `mpga’.
VLC probably does not support this sound or video format.
and/or
main decoder error: no suitable decoder module for fourcc `mpgv’.
VLC probably does not support this sound or video format.

I have absolutely no idea why this happens, but apparently the VLC that comes with some common repos for OpenSUSE (I think I got this having installed from Packman!) is somewhat borked. Want a working VLC? Grab it from the Videolan repo. I installed that in desperation and all was suddenly right with the world.

(I half didn’t want to make this post since I can’t actually explain what the problem is and am too lazy to find out, but this solution needs some Google love, so here)

1196
Rate this post
Thanks!
An error occurred!

Building mplayer-mt for Multi-Core HD Video Decoding

Unable to play that 1080p video without lagging? Wanna watch that 720p video file on dated hardware? Well here’s something you can try. Basically the default behavior of most video players is such that they only hog a single core while doing video decoding. If we also commit all the other available cores to the task, well, we’ll of course expect to get better performance. You won’t get double or triple the performance of course – things don’t work out that simply. The difference is noticeable though.

This isn’t a new method. However, the old instructions don’t seem to work anymore – the ffmpeg-mt branch no longer seems to build with mplayer without non-trivial modifications. Fortunately, all the improvements in the ffmpeg-mt branch have recently been merged into the main release. So we can now use the main release instead.

  1. Grab the mplayer source:

    svn co svn://svn.mplayerhq.hu/mplayer/trunk mplayer

  2. Grab the source for the latest ffmpeg release here. The version I tried is the latest one as of the writing of this post: 0.9.1. Simply download and extract the ffmpeg folder into the mplayer folder from the previous command.
  3. Now build mplayer:

    cd mplayer
    ./configure
    nice make -j 4

  4. And install it as ‘mplayer-mt’:

    sudo install -m 755 mplayer /usr/bin/mplayer-mt

Now you can use mplayer-mt to play more performance-intensive videos and should perceive a noticeable improvement, assuming you have a multi-core processor. If you use a GUI frontend like smplayer, look for an option that lets you specify the mplayer executable, and replace it with mplayer-mt.

Unfortunately I have no idea if anything similar is possible with VLC. If you do, kindly let me know at the comments.

1191
Rate this post
Thanks!
An error occurred!

Fixing your slow/laggy dolphin WITHOUT killing nepomuk

Try this before pulling the plug on Nepomuk!

As stalwart as I am a fan of the dolphin file manager and the nepomuk technologies it integrates, I was recently forced to admit that the thing was really slowing down, close to the point of unbearability, on my system. I assumed that the most direct solution was to disable nepomuk, but I like nepomuk. As it turned out though, fortunately, the solution didn’t involve toggling nepomuk stuff at all.

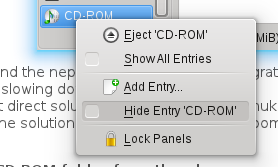
Try it: simply remove/hide your trash and DVD/CD ROM folder from the places panel.

The difference is bafflingly, inexplicably fantastic, my dolphin’s on steroids now. So, friends, if your dolphin ain’t playin nice with ya, try this out first before you pull the plug on nepomuk.

Source: This magnificent man’s post.

1153
Rate this post
Thanks!
An error occurred!

Running Graphical/GUI programs from rooted terminal on Linux

Everywhere across the Internet you’ll find “answers” to this question that tell you to do gksudo and kdesu and if you’re like me you get by by working around your problem in some way that lets you gksudo or kdesu – until that one time when it just doesn’t cut no matter which way you slice it. That time is now for me, and what a surprise, it’s a damn pain in the neck to actually dig out a solution from amidst the mountain of “use gksudo/kdesu”s.

So here’s me penning this post to hopefully help combat the million other gksudo/kdesu posts out there – because sometimes, you need stuff run – graphically and as root – when you’re not around to type a password.

Solution is surprisingly simple. Your X display is normally loyal only to you (the user) and will not answer to any other user, not even root. If you tried to run a graphical application from a rooted terminal, it’ll say something like the following:

X11 error: Can’t open display :0

Which is your application’s plaintive cry at being shut out by X. So to get around this, you basically just need to tell X to stop doing that. Like so:

xhost +

Run it as your regular user (X normally ignores everyone else remember?). And that’s it! Try it. Open a terminal, su, and open firefox or something.

PS: yes I’m not dead yet, and yes I still haven’t finish that blasted Eva post I’ve been sitting on for ages ;_;

1149
Rate this post
Thanks!
An error occurred!

Dealing with “cmake/modules/FindKDE4Internal.cmake not found”

Not the most intuitive error message ever:

CMake Error at /usr/share/cmake/Modules/FindKDE4.cmake:98 (MESSAGE):
ERROR: cmake/modules/FindKDE4Internal.cmake not found

and the exact problem wasn’t immediately obvious to me, even after having dabbled in CMake-ing and KDE-ing for some time. Anyway, problem is simple – you’re missing some KDE development stuff. For me (OpenSUSE) I had to install the kdebase-workspaces-devel package. Look for something similar in your repositories and install it, and you should be good.

1132
Rate this post
Thanks!
An error occurred!

“The host key for this server was not found, but another type of key exists.” When using sftp with dolphin/KIO

I’m halfway through my Cosfest X.1 event post, but I bumped into yet another funny issue while working today, so I’m gonna do another quick solve-it post here. If you ever had the following error message shown to you when attempting to access an sftp location via dolphin or KIO in general:

“The host key for this server was not found, but another type of key exists. An attacker might change the default server key to confuse your client into thinking the key does not exist. Please contact your system administrator.”

This might be for you. In particular if you have successfully ssh-ed into the target host before. Following the discussion here, it appears that the problem, in summary, is KIO not being able to recognize a particular (new?) format of specifying a host in the ssh known_hosts list (a bug which has been filed here). Fortunately there is a workaround – since KIO is unable to recognize the known_hosts entry that ssh produces, we simply need to get KIO to be the one to produce the entry.

Back up your ~/.ssh/known_hosts file, then open it with your favorite text editor. Find and remove the entries associated with the host you’re trying to sftp into. If you cannot find it you can just delete everything in the file – with the side effect that you will be prompted again to add the keys back the next time you ssh into a previously known location. When you’re done, open dolphin and attempt to sftp into your desired target location. It should prompt you to add the host’s key – just tell it yes and you should be able to log in successfully.

That’s it! From then on you should be able to direct ssh or sftp-via-KIO into the location whenever you want.

1117
Rate this post
Thanks!
An error occurred!

Smplayer UI hanging after update in OpenSUSE?

Just gonna pen a quick note. Smplayer, the pretty great Qt-based frontend for mplayer that I use, started behaving strangely after I performed a recent software update. Symptoms are – video plays, but does not respond to common keyboard commands like ‘f’ to full-screen and arrow keys to skip. Also, the GUI becomes unresponsive – you can’t click anything. I didn’t spend too much time looking up the source of the problem, but it may be related to this.

I’ve discovered you can workaround this annoying problem by installing mplayer2 and then configuring smplayer to use that instead of mplayer. Simply install mplayer2 via yast or via

sudo zypper install mplayer2

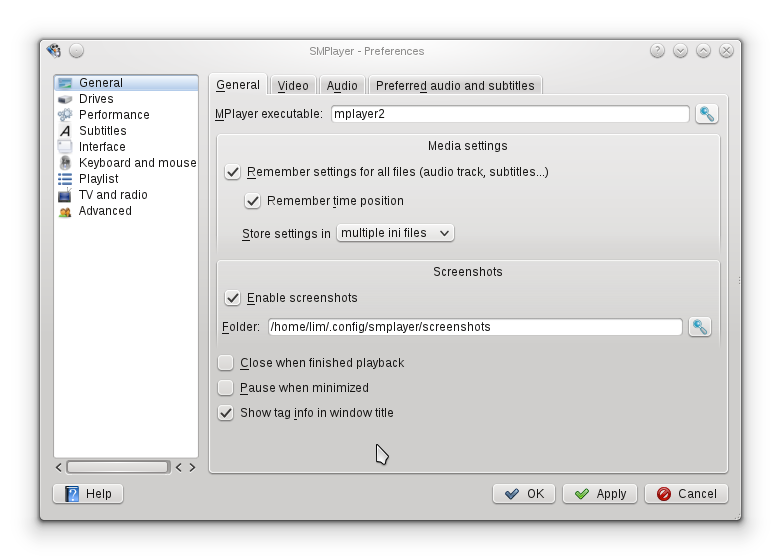
Then start smplayer (without arguments! If you load it with a video the UI will freeze!) and go to Options > Preferences > General > General and key in “mplayer2” for the field “Mplayer executable:

While there are some differences between mplayer2 and mplayer, everything appears to work fine using it with smplayer so far, so I’m pretty happy.

1116
Rate this post
Thanks!
An error occurred!

Custom Textures for the Kwin Snow Plugin – the Hacky way

Now I am and have always been a fan of the compiz snow plugin. I remember spending some of the earliest days of my Linux life haphazardly getting bombastic desktop effects running and joyfully ignoring how many of the plugins were in the “Bad” list. Those were the days. I sit on KDE’s elegant Plasma nowadays and although Kwin also sports a (not so “Bad”) snow plugin, it has never quite lived up to the compiz version that I knew and loved. Over the years it has matured and stabilized quite a bit, but the key feature that’s still missing for me is being able to swap snow out for autumn leaves and sakura petals – custom textures.

Not entirely sure why, but the other day it just suddenly hit me that hey, it shouldn’t be that hard. There’s a texture stored somewhere that Kwin uses – I just need to find and replace it right? Turns out that was precisely right. The snowflake texture used by the plugin is

/usr/share/kde4/apps/kwin/snowflake.png

So how do we use a custom one? Find a png image to use as custom texture, and simply rename it “snowflake.png” and copy it into /usr/share/kde4/apps/kwin/! Do backup the old one first though just in case. After you’ve done that, disable the plugin, click apply, reenable it, click apply, and when you toggle the snow it should descend with your custom texture.

Here’s a screenshot where I use this leaf to create lazily descending autumn foliage:

Photobucket

Next step would be to find time and see if I could write a patch to make a non-hacky way to do this :)

1109
Rate this post
Thanks!
An error occurred!

Dual/Multi-head Monitors on Linux – the Xorg Hurdle

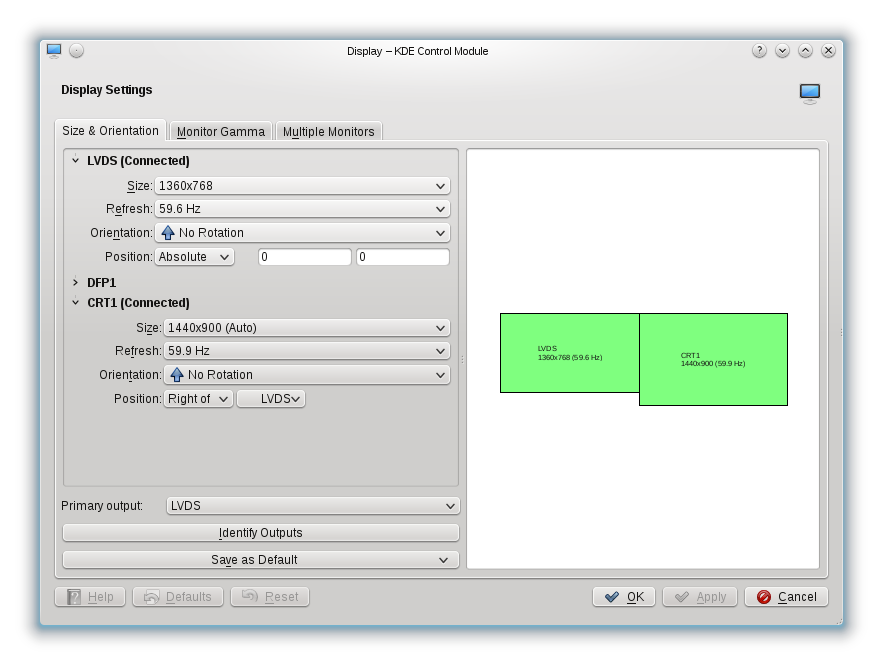
Okay, I’m gonna post this in here once and for all, if for nothing more than my own recording purposes. So the somewhat sticky problem of multiple-monitor configuration is getting very nice and shiny new GUI’s in Linuxland nowadays. KDE Plasma 4.6, for example, has something like this:

Very lovely. The vexing thing however is that it doesn’t have “full control” so to speak. It’s likely a xrandr frontend, and that’s all nice and good except that if your Xorg config isn’t set up right, no configuration actually works, except for cloning, which clearly isn’t the most useful set up around. It turns out that you need to set the maximum virtual screen size to a value larger than required for your set up. For example if you’re configuring a 1280×800 desktop and a 1440×900 desktop side-by-side, you’ll need a virtual screen size of at least 2720(1280 + 1440)x900, and if they’re stacked vertically you need at least 1440×1700(900+800). How do you set the virtual screen size? Open /etc/X11/xorg.conf in your favorite editor as root:

sudo nano /etc/X11/xorg.conf

And under the “Display” subsection of the “Screen” section, add a “Virtual” line with your desired virtual screen dimensions as arguments. Example:

Section "Screen"
	Identifier "aticonfig-Screen[0]-0"
	Device     "aticonfig-Device[0]-0"
	Monitor    "aticonfig-Monitor[0]-0"
	DefaultDepth     24
	SubSection "Display"
		Viewport   0 0
		Depth     24
		Virtual		3000 3000 # <-- ADD THIS LINE!
	EndSubSection
EndSection

And you should now be able to configure your multi-head set up with xrandr or with your preferred graphical frontend (in KDE Plasma 4.6 the frontend is at System Settings > Display and Monitor > Size and Orientation).

You know what the worst thing is? Software updates sometimes rebuild your Xorg.conf, overwriting your changes, which means that you may need to repeat the above again after certain updates. That’s what just happened to me, so I’d keep this page (or whatever other page on this problem you find) bookmarked.

1049
Rate this post
Thanks!
An error occurred!

Page 2 of 4

Powered by WordPress & Theme by Anders Norén