Between Linux and Anime

Kind of like Schrodinger's Cat

Category: Linux (Page 1 of 5)

Zypper/Yast Software Management Freezing ~ Fixing

So there are a good number of threads for zypper/yast hanging up in the middle of various actions, but none were relevant to my particular problem, so throwing this out into the googlespace for the next person who might end up facing my problem.

The Symptoms: Yast Software Manager and Zypper would randomly freeze and stay frozen apparently indefinitely – at least for hours. The freeze occurs seemingly randomly in the midst of any action that may require downloading – including refreshing repositories and actually downloading packages/updates.

What is happening: Staring at zypper output on -vv I began noticing that it always hangs up when trying to download something from download.opensuse.org. It doesn’t do so consistently: most of the time the download happens, but sometimes it doesn’t and it freezes forever – but always when attempting to download from download.opensuse.org. With some research I found out that download.opensuse.org isn’t actually a centralized download repository but uses something called mirrorbrain that transparently redirects you to a chosen download mirror. So it would appear that one of those mirrors were having trouble with me – perhaps my IP is somehow blacklisted by that server. What’s confounding is that it doesn’t seem to be able to flag an error or at least timeout so I can be served another mirror or simply retry – it just goes on staying stuck forever.

Solution: With the hypothesis that one of the mirrors is somehow rejecting me in this inexplicable way, a direct solution would be to simply find a mirror that is happy with me, and force zypper/yast to use it. For core OpenSUSE packages (distribution and update), a list of mirros is available here. For the repositories at http://download.opensuse.org/repositories/ though, I couldn’t find a mirror list. Instead, I discovered that when you open the listing of packages on a browser, for eg here, you can click on ‘details’ next to any package and that shows a list of mirrors you can get the package from.

So armed with this knowledge, I simply went through all my enabled repositories, looked for all repositories that have download.opensuse.org as source, and replaced the url with that of a specific mirror. After that zypper and yast operated without problems.

Of course, this is a non-optimal set up, so after a while you might consider switching back to download.opensuse.org and see if the problem has gone away.

Or not.

1439
Rate this post
Thanks!
An error occurred!

Fixing Chromium/Chrome Ignoring Touch Input on Linux

Recent versions of Chromium (and, presumably, Google Chrome) appear to be capable of differentiating between input from a touch screen, and input from a mouse. The problem is, on Linux, you’ll often find the capability a counter-productive one, since chromium sometimes outright IGNORES all touch input, rendering chromium utterly inoperable with a touchscreen. Mouse and touchpad operates chromium okay? Touchscreen operates other applications okay but you can’t so much as click a link on Chromium? You’re probably experiencing what I’m talking about.

There’s a report here, but it doesn’t seem to be going anywhere at the moment. Apparently Ubuntu carries a patch that tries to fix this, and I’m not sure how well it works, but at least on OpenSUSE we appear to be on our own. Fortunately, it’s possible to workaround, based on a suggestion in the comments.

First, on the terminal, type

xinput list

You should get a listing that looks like

⎡ Virtual core pointer                          id=2    [master pointer  (3)]
⎜   ↳ Virtual core XTEST pointer                id=4    [slave  pointer  (2)]
⎜   ↳ Atmel Atmel maXTouch Digitizer            id=10   [slave  pointer  (2)]
⎜   ↳ SynPS/2 Synaptics TouchPad                id=13   [slave  pointer  (2)]
⎣ Virtual core keyboard                         id=3    [master keyboard (2)]
    ↳ Virtual core XTEST keyboard               id=5    [slave  keyboard (3)]
    ↳ Power Button                              id=6    [slave  keyboard (3)]
    ↳ Video Bus                                 id=7    [slave  keyboard (3)]
    ↳ Power Button                              id=8    [slave  keyboard (3)]
    ↳ Lenovo EasyCamera                         id=9    [slave  keyboard (3)]
    ↳ Ideapad extra buttons                     id=11   [slave  keyboard (3)]
    ↳ AT Translated Set 2 keyboard              id=12   [slave  keyboard (3)]

You need to look for the name of your touch screen hardware. In the above case, that is “Atmel Atmel maXTouch Digitizer”. Note the id number for the hardware on the right, 10 in the above case.

What you need to do is pass this id as a parameter to Chromium/Chrome. Like so:

chromium --touch-devices=10

Replace 10 of course with the id of your device. Launched this way, touch input should actually work reasonably on Chromium. In particular – you can switch tabs with touch, touch links to visit them, and even touch-scroll.

Of course, it’s a little tedious to do this every time you want to start Chromium. Fortunately, it’s not hard to put it all in a script. Like so:

#!/bin/bash
SCREEN=`xinput list | awk '/maXTouch/ { gsub(".*id=",""); print $1 }'`
exec chromium --touch-devices=$SCREEN

Of course, you’ll need to change ‘maXTouch’ above to a suitable identifier for your particular device, but running the script should start Chromium in touch-usable state. If you want, you can even modify your application menu entry to call this script instead of the Chromium binary directly.

UPDATE

It seems the above doesn’t quite work anymore on recent versions of Chromium. On my own box I’ve found that I now need to use the id of the parent item – ie “Virtual Core Pointer”, id=2 in the listing above. The rest of the procedure is basically the same, and if you use the script above you’ll need to make a minor adjustment to look for Virtual Core Pointer instead.

If you find, like I did for my box, that the id for Virtual Core Pointer stays the same all the time, instead of making a script you could just add the command line flag to the Chromium default settings config file. On OpenSUSE 13.2 this is at /etc/default/chromium, though I hear it can also be at /etc/chromium/default on some platforms. Simply add the following to the file:

CHROMIUM_FLAGS="--touch-devices=2"

This is cleaner and would probably also live across version updates :)

1390
Rate this post
Thanks!
An error occurred!

Binding the “Windows Button” to Right-Click – KDE Plasma on Tablet

Or to most anything else really. So this is what I hope will become the first of a series of blogs documenting my adventures getting a regular KDE Plasma (desktop) installation to tango with an x86 touch device – common nowadays in the form of Windows 8 tablets.

On my Machine and OS:
My specific machine is a Lenovo Yoga 11s (Haswell version), so not fully a tablet, but convertible into one by flexing the lower half all the way to the back. I had initially attempted with fair success to set up a Plasma Active-based system (by using experimental OpenSUSE Plasma Active packages), and with the right amount of tinkering that actually worked very well. However I eventually bumped into a few insurmountable hurdles: for example, the inability to set up Chinese and Japanese input since Maliit (the virtual keyboard) was an input method and, to the best of my knowledge, not dynamically switchable with a foreign language input method like ibus. So when inevitable circumstance eventually forced me to set up everything from scratch again, I decided this time to start with a regular KDE Plasma Desktop (on top of OpenSUSE 13.1), and see if I can harness the inherent malleability of Plasma and of Linux itself to achieve an acceptably touch-friendly setup.

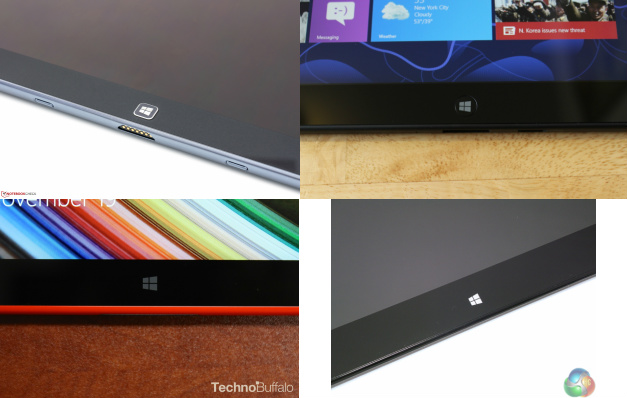
Anyway on to the topic at hand. One of the distinguishing features of most x86 tablet computers today is that they, being originally sold as windows machines, sport a physical “windows button” near the screen:

This button on Linux would be bound to “super”, which on most DEs makes it basically useless since “super” by itself doesn’t usually do anything. On the other hand, touch screens on Linux generally simply behave like mice do, where taps are clicks and swipes are click-drags. The right click context menu is invaluable when using a traditional Linux desktop without a keyboard, and yet there is no direct way to right click with a touch screen. So a very useful customization I was able to put on my system is to bind the useless “windows button” to right-click.

This is less trivial than it might initially appear. A major pitfall is that while “super” on Linux by itself generally doesn’t do anything, it is heavily used as a modifier key for many keyboard shortcuts in most setups. So we need to bind “super” to a custom trigger, while at the same time preserving its use as a modifier key so that we don’t affect the keyboard shortcuts. Fortunately, someone has already worked this out for us. KSuperKey was originally written to allow KDE Plasma users to open the Kickoff menu (or the KDE Desktop’s “start menu”) by hitting just the super key a’la windows, but the program is also powerful enough that it could be used to bind the super key to any key combination – while preserving its status as a modifier key.

So as a first step, grab and install KSuperKey, then use it to bind super to a currently unused key-combination. For example, to bind super to Alt + F10, run the following:

ksuperkey -e 'Super_L=Alt_L|F10'

You can add this to a script in ~/.kde4/Autostart/ so that it is run automatically on session startup. Now hitting the windows button should be the same as hitting Alt + F10, so the next step is to map Alt + F10 to right click. But how do we emulate right click in the first place? Turns out it isn’t half hard. Just install xdotool, and create a script called fake-right-click (or anything you want) with the following contents:

xdotool click 3

Give it execute permissions and run it and you should immediately see the right click context menu open next to your mouse pointer! So now all we need to do is bind Alt + F10 to our new script.

You may think this easily achievable using the built in KDE custom shortcuts control module, and indeed this was what I tried first, but it turned out that for some reason or another this wasn’t reliable, and hitting the windows button would sometimes bring up the context menu and sometimes not. A more reliable means by experiment is to use xbindkeys. Using it for our purposes is quite easy: get it installed, then create the file ~/.xbindkeysrc with the following content:

"/path/to/fake-right-click"
alt + F10

Then simply run xbindkeys. (Again, you can add xbindkeys to a script in ~/.kde4/Autostart/ to have it run on session startup). That’s the last step! Hitting the windows button now should behave exactly like right click, letting you do all kinds of things previously not possible without a keyboard and mouse:

1333
Rate this post
Thanks!
An error occurred!

Get PCSX2 Working On 64bit OpenSUSE/Linux

It’s surprisingly hard to get the Playstation 2 emulator PCSX2 working if you’re running a 64-bit linux system, even though they’re cross platform and release linux binaries/sources first hand. The primary roadblock seems to be that the thing assumes a 32bit environment, and will refuse to start if it doesn’t find some 32-bit libs. Anyway, I got this working twice, both times quite bumpily, and decided it was high time this got written into a post for archival.

Credits by the way to this video which put me on the right track.

First, we gotta get PCSX2. This can either be downloaded from the site linked above, or, on OpenSUSE, can be obtained in packaged form from Pacman’s Games repo (mirror for 13.1 here).

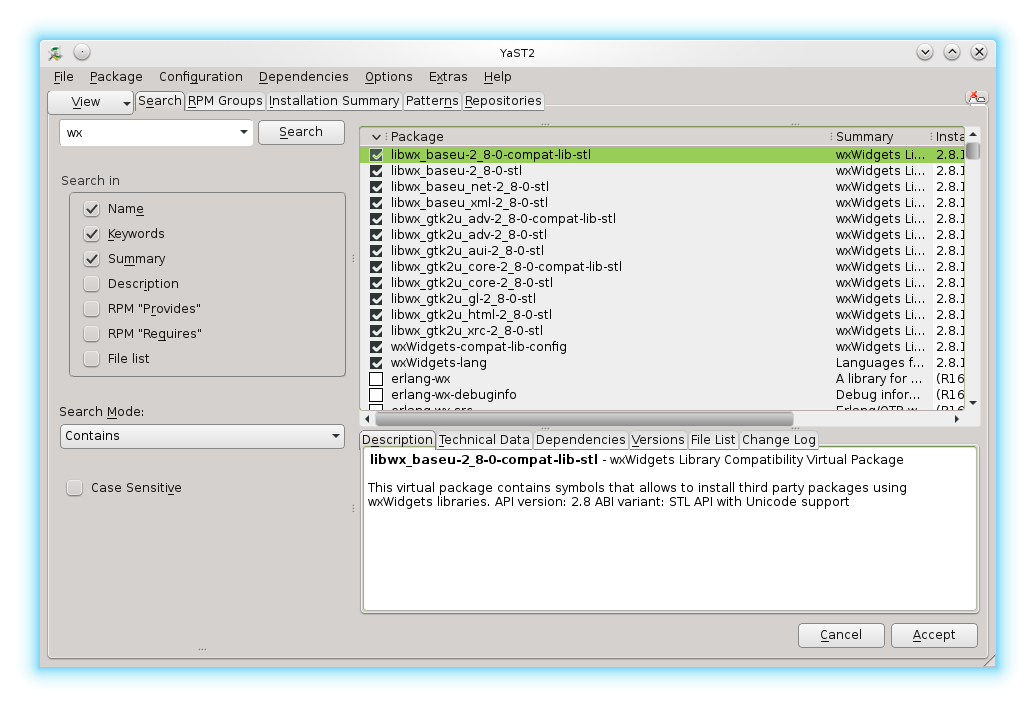
Then we gotta grab the 32-bit libs that are needed. If you installed it with dependencies off the Pacman repo this may be taken care of for you (I’m not 100% sure), but in any case what you need to do is to pull out the Yast software installation interface and do a search for ‘wx’. This should get you a list like the following:

Now make sure each of those installed items are installed as 32-bit versions. Basically, click each of them, then click the ‘Versions’ tab, and make sure the ‘i586’ version is selected. Else select it, and apply at the end. For other distros, the gist I guess is to make sure you have 32bit/i586 versions of libwx and wxWidgets packages installed.

That should net you the required 32-bit libs, and you can give the pcsx2 executable a whirl at this point and hope for the best. In my case, I had one more hurdle before PCSX2 would run – the thing seems to be looking for the libwx libs in the wrong path. Fortunately it’s possible to tell it manually where to load the libs from by setting the LD_LIBRARY_PATH environment variable. This can be set right before running PCSX2 like so:

LD_LIBRARY_PATH=/usr/lib/wx-2.8-stl/ pcsx2

/usr/lib/wx-2.8-stl‘ is where the 32-bit libwx .so’s are on my system. This may vary for different distros, but it shouldn’t be overly hard to locate. Setting LD_LIBRARY_PATH appropriately allowed me to actually launch the PCSX2 UI, where configuring plugins, BIOS, etc may then proceed.

Running on integrated Intel graphics (I’m on a Lenovo Yoga 11s, Haswell version), the GS plugin that let me run games quite performantly is GSdx, configured to use “OpenGL (Hardware)”. Note that in Linuxland, open source drivers for higher-grade graphic cards (think Nvidia, ATI) don’t tend to perform well for graphic-heavy applications, so you’ll want to either switch to the proprietary drivers for those cards (if they exist and can be obtained), or to fall back to using the integrated Intel graphics chip, which tends to have good open source drivers.

I also had trouble with sound initially, which I was able to get around by first disabling Pulseaudio. Then, using the Spu2-X SPU plugin, configured to

Module: PortAudio
PortAudio API: ALSA
Synchronization mode: TimeStretch
Latency: 50

I was able to get pretty good sound for my games. Note that with ALSA it’s possible to get into a funny situation where ALSA selects a non-working sound card as default sound card – causing you to have no sound since the SPU plugin appears to be hardwired to use ALSA’s default card. This can in turn be remedied using the solution documented in my previous blog post.

Edit: it looks like one does not actually need to disable Pulse. If you can’t get sound on Pulse, try making the updated ~/.asoundrc file documented in my previous blog post. Using that I am able to get PCSX2 on PortAudio to coexist with all my other sound applications.

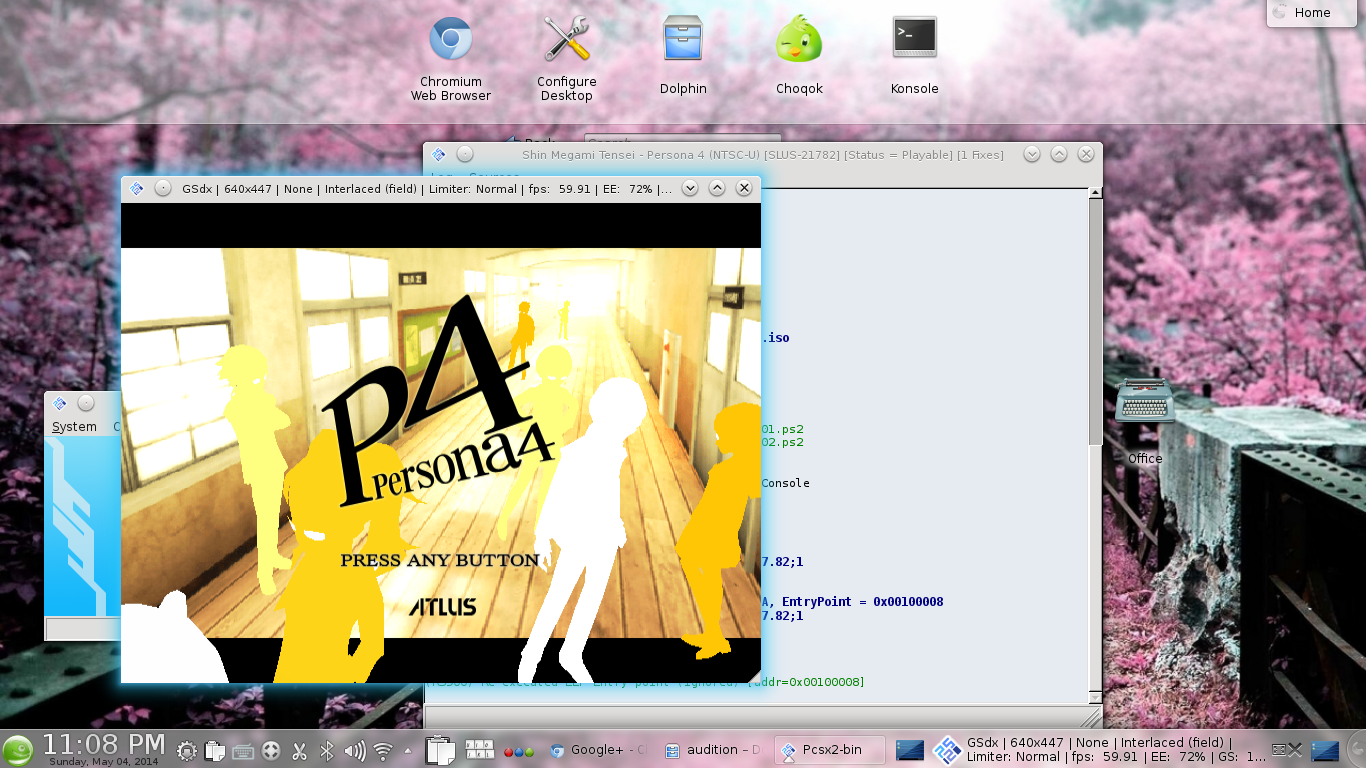
Whew! And that should cover everything. At least, that’s everything I know :) Perhaps it might help someone struggling with it as I was, but for now, I’m just happy to be able to play Persona 4 on Linux ^^

1329
Rate this post
Thanks!
An error occurred!

Selecting Alsa’s Default Sound Card

So yeah I’m still alive. Just on hiatus thanks to loads of irl stuff, as usual. I suppose the saving grace of this blog’s livelihood is that I’ll always have practical motivations to come here and drop a fixit I discover – since it works as my own personal documentation as well. I still want to write anime of course, I just need to find the time.

Anyway, shoutout to Idyllictux for his help with this one.

So OpenSUSE comes built with Pulseaudio nowadays, and for the most part it’s well set up and “just works”. There are obscure cases where it doesn’t quite perform though, for me anyway, cases like recording sound via the mic input, and playing games on PCSX2. Wonderfully enough, it’s fairly trivial on OpenSUSE to kill Pulse and fall back on Alsa. Having done that though, I found myself in a peculiar pickle where Alsa appeared to have found 2 sound cards and picked the non-working one for default. This, too, is not normally a big problem, since for KDE stuff you could just configure phonon in one place, and for stuff like smplayer you could just direct it manually to use the right sound card. Sometimes though, like in PCSX2’s case, things appear to be hardcoded to use the default soundcard, leaving you with non-working sound.

I tried Googling briefly for how I could tell Alsa to disable/forget a sound card, or to switch its default sound card, and found that there, apparently, used to be a tool called ‘asoundconf’ that lets you deal with such things. However, I wasn’t able to find nor install this on my system. Fortunately, Mr Idyllictux demonstrated there was another way:

First, list your sound cards with:

aplay -l

You should get an output that looks like:

**** List of PLAYBACK Hardware Devices ****
card 0: MID [HDA Intel MID], device 3: HDMI 0 [HDMI 0]
Subdevices: 1/1
Subdevice #0: subdevice #0
card 0: MID [HDA Intel MID], device 7: HDMI 1 [HDMI 1]
Subdevices: 1/1
Subdevice #0: subdevice #0
card 0: MID [HDA Intel MID], device 8: HDMI 2 [HDMI 2]
Subdevices: 1/1
Subdevice #0: subdevice #0
card 1: PCH [HDA Intel PCH], device 0: CX20756 Analog [CX20756 Analog]
Subdevices: 1/1
Subdevice #0: subdevice #0

Look for the number of the sound card you want to make default. Then, create (or edit) the file ~/.asoundrc with the following:

pcm.!default {
type hw
card 1
}

Replacing the ‘1’ in ‘card 1’ with the number of the sound card you want to be default. Save it and restart your session, and Alsa should now use the card as default.

Edit: The above will work, but will also create the iffy (and sickeningly familiar) problem of every sound application hogging the sound card (so you can’t have two applications playing sound at the same time). Copying and trial-and-error-ing blobs of config from Idyllictux‘s setup, I was able to discover an optimal .asoundrc as follows:

pcm.!default {
type hw
card 1
}

pcm.!default {
type plug
slave.pcm "dmixer"
}

pcm.dmixer {
type dmix
ipc_key 1024
slave {
pcm "hw:1,0"
period_time 0
buffer_time 0
period_size 2048
buffer_size 32768
rate 44100
}
bindings {
0 0
1 1
}
}

Replace ‘Card 1’ with your card as per above. This config (which also works with pulse enabled) actually lets everything I have co-exist sound-wise (including PCSX2 on PortAudio, and smplayer using ‘alsa’ for audio). The only minor downside is that if you run this with pulse, you’ll lose the per-app volume control feature, presumably because we’re bypassing pulse’s software mixer.

This was the last link I needed to get PCSX2 fully working on my 64-bit Linux system. I’ll try and find time to document that one too, hopefully in the near future.

1326
Rate this post
Thanks!
An error occurred!

Applying Kwin Blur to Transparent Konsole/Yakuake Windows

If you use Konsole or Yakuake with transparency you might have noticed that Kwin’s blur effect, that has been around for awhile and that blurs the background of various transparent elements in the UI (eg panels and plasma popups), does not apply to transparent Konsole or Yakuake windows. This has always irked me a tiny bit, but when I discovered that you can blur transparent terminal windows on OSX, that got me itchy enough to do the token research.

The story is a familiar one: it’s not too hard just to GET WORKING, and patches to do it exist, however getting it to work in a sensible way is non-trivial, and so the patches are rejected and the feature itself is pending future structural changes. Basically, it’s not going to happen on it’s own anytime soon.

Fortunately, there are ways to get it working on your own – and they do not involve applying custom patches and rebuilding anything. Turns out there is a terminal command one can run to immediately apply blur on, for example, current active Konsole windows:

xprop -f _KDE_NET_WM_BLUR_BEHIND_REGION 32c -set _KDE_NET_WM_BLUR_BEHIND_REGION 0 -id `qdbus org.kde.konsole /konsole/MainWindow_1 winId`

And for a currently active Yakuake:

xprop -f _KDE_NET_WM_BLUR_BEHIND_REGION 32c -set _KDE_NET_WM_BLUR_BEHIND_REGION 0 -name Yakuake

Now to do this automatically so that your yakuake and konsole windows are ALWAYS blurred, you can simply add the following lines to your ~/.bashrc:

Spoilered: Old, not so good code Show

Edit: commenters have posted improved versions of the code, thanks commenters! See improved version below:

Spoilered: Code for non-KF5 and old yakuake Show

Edit2: KF5 Konsole and Yakuake 3 onwards requires updated code, as well as xdotool to be installed so we can fetch yakuake’s win id:

konsolex=$(qdbus | grep konsole | cut -f 2 -d\ )
if [ -n "$konsolex" ]; then
for konsole in `xdotool search --class konsole`; do
xprop -f _KDE_NET_WM_BLUR_BEHIND_REGION 32c -set _KDE_NET_WM_BLUR_BEHIND_REGION 0 -id $konsole;
done
fi
if [ `qdbus | grep yakuake` ]; then
xprop -f _KDE_NET_WM_BLUR_BEHIND_REGION 32c -set _KDE_NET_WM_BLUR_BEHIND_REGION 0 -id `xdotool search --class yakuake`;
fi

Of course, this often results in the command being run redundantly, but that doesn’t appear to bring any tangible ill-effects. It all works well enough for a quick hackaround. And the results are delicious indeed.


1316
Rate this post
Thanks!
An error occurred!

Getting the Maliit/Plasma Active Virtual Keyboard working for Gtk apps in PA3

I’ve had more frustration than I’m comfortable admitting to trying to get this to work – I actually gave up and compiled kvkbd at one point. Now that I have it down though it all looks infuriatingly obvious in hindsight. Anyway..

The problem: if you have the official Plasma Active 3 image installed and running on some device, and at some point or another installed/ran a gtk app on your system, you’ll quickly realize that the Maliit-based virtual keyboard does not trigger in your gtk app. That’s contrary to what was promised from the Maliit move! And in fact Maliit predates Plasma Active and should have perfect gtk support, so what gives? It turns out that Plasma Active only includes the Maliit input context plugin for Qt and not for gtk, and that’s basically the problem. (Presumably they decided to save it since the image does not include anything gtk)

The solution: You basically need to install that gtk input context plugin. What I did was I took the package from the recommended repos for openSUSE linked from the Maliit website (specifically this repo). The commands to run (as root!) are:

# zypper ar http://download.opensuse.org/repositories/M17N:/Maliit/openSUSE_Factory/ maliitosfact
# zypper refresh
# zypper in maliit-inputcontext-gtk2

And then update the gtk immodules before rebooting:

# gtk-query-immodules-2.0 > /etc/gtk-2.0/gtk.immodules

Note: Zypper will complain about different maliit versions and prompt you to fix by pulling and replacing packages from the openSUSE repo – DON’T DO IT! Just tell it to break maliit-inputcontext-gtk2 by ignoring some dependencies so you install only one package!

You might also want to disable the openSUSE maliit repo after you’re done so you don’t inadvertently pull stuff from it in future:

zypper mr -d maliitosfact

I’m not 100% sure pulling and replacing those packages will actually cause bad things to happen, but I’ve learnt by being bitten – painfully – multiple times not to risk these things if at all possible :) Anyway, the plugin in fact does work perfectly with the Maliit stuff from Plasma Active despite the zypper warnings:

Plasma Active Maliit Keyboard working on an old Fennec build

Of course, this all only works assuming you’re on an i586/x86 device. It’ll probably be harder to find binary packages for the input plugin on arm for example, but this should hopefully at least point you in the right direction. Perhaps you could just build it from source or something.

I know it’s probably already near the end of PA3’s lifecycle now, but hopefully this will still help some frustrated soul out :)

1310
Rate this post
Thanks!
An error occurred!

Playing Multiple Subtitles Simultaneously with Mplayer

Well, with any player that plays ass subs really, but the procedure requires Mplayer :)

(I know I haven’t written a real post in a good while and this doesn’t quite count. I’ll post soon! I hope.. at least, I’m positively definitely trying to really write a proper post and push it out as soon as I’m positively capable of doing. No really!)

So I found myself needing to have both english and chinese subtitles on at once today and struggled with it briefly. I eventually found the solution in the form of a script called merge2ass (Source). What it does is it takes two different subtitle files and smushes it into a single ass file that basically shows the first subtitle file at the top of the screen and the second subtitle file at the bottom, something like this:

Yuki is sad all this is harder than she wanted

Usage of the script is simple enough. Make it executable, then supply the video file, the first subtitle file, then the second. You can also just run the script without arguments and it’ll show a nice help message.

chmod +x merge2ass.sh
./merge2ass.sh yourmoviefile.format sub1.srt sub2.srt

This will produce a file called yourmovilefile-bilingual.ass that you could then load with mplayer (or whatever other player you want) to get simultaneous dual subtitles.

Oh right, for this to work with chinese subtitles, you need to change line 125 and/or 128 of the script and supply -subcp enca:zh:BIG5 as an mplayer option, as per this post. Just add it immediately after ‘mplayer’, like so:

mplayer -subcp enca:zh:BIG5 -dumpsrtsub -noautosub -really-quiet -frames 0 -sub "${sub[1]}" "$movie" 2>>"$mplayer_err" && echo "Done"

1287
Rate this post
Thanks!
An error occurred!

Associating Firefox Profiles with KDE Activities

As a heavy user of the Activities feature, I’ve always had two major itches. One was addressed when KDE 4.9 finally brought the ability to set activity window rules. The other was how only some applications had the necessary (XSMP) compliance to work properly with activities and its session restoring – in particular, a lack of compliant web browsers.

Read More

1239
Rate this post
Thanks!
An error occurred!

Nepomuk and Anime, my new pet project

Some time ago I stumbled upon a cool little piece of code that Sebastian Trueg wrote, which sourced an online tv database (the TVDB) for meta information about video files of TV series you had on your disk, figuring out what the series, season and episode was from the filename, and storing that info in the Nepomuk semantic framework. That happened to coincide with some of the ideas I had on how a semantic desktop should work with regards to media consumption, and specifically for watching and dealing with Anime. Anyway I recently cleared myself some hobby-hacking time, rolled up my sleeve, set Trueg’s little program up on my box, and tinkered a little with the filename analyzer. Result of which is that the program now also recognizes common anime rip filename formats, and since the TVDB also contains a pretty comprehensive list of anime, we get the following:

Pretty sweet :) In fact, the way Trueg wrote it, you don’t even need to go through the context menu when you add a new file, Nepomuk/Strigi automatically attempts to fetch the metadata when it indexes your new file. So what is the point of this? Point number one of course is that it’s pretty cool! Point number two is that all these metadata are stored in Nepomuk, which in turn makes these data available to any other program running on the desktop that recognizes and queries it. What kind of programs would want to do so? In short, plenty. Some ideas off the top of my head would include a media player that knows what episode of what series it is playing, and can automatically offer to play the next episode, or list the other episodes of the series that you have. Or a series browser (plasmoid?) that let’s you browse your videos by series instead of by folder. Your imagination is the limit. I would myself like to try to make some of those happen, but that’ll be getting too far ahead for the time being.

This program in it’s current state has a glaring problem in the context of anime: the TVDB web api (through which the program searches for the series info) does not support aliases, and so you need to be searching for the precise name of the series as stored on TVDB or you’ll turn up blank. And with anime, series names can vary pretty wildly. For example, querying “Dantalian no Shoka” doesn’t work because the series is stored in TVDB as “The Mystic Archives of Dantalian”. It’s an annoyingly serious shortcoming – half of my files don’t work thanks to this.

So fixing this will be what I’ll work on next. TVDB says they’ll support aliases in their new site, but there’s no release date of that in sight. A simple solution would be to query a different site, like MAL, which appears to have a decent API. In fact, new web sources and APIs should be pluggable, so that’ll be task number one, separating the web-sourcing part into a plugin infrastructure.

I do have some vague plans on the future of this thing, but let’s not count our chickens too much. We’ll get there when we get there. In the meantime if you want to play, you can clone my git repo and grab the source code:

git clone git://git.code.sf.net/p/nepomukoracle/code nepomukoracle-code

In order to build this you’ll also need Trueg’s libTVDb and Shared Desktop Ontologies 0.9.0 and onwards – look for that one in your repos.

1220
Rate this post
Thanks!
An error occurred!

Page 1 of 5

Powered by WordPress & Theme by Anders Norén